Garrattfan's Modelrailroading Pages
OO9 NGG16
Chapter 8 Frame and boiler
March 2009 Well, still being in the process of finding the courage to resume work on the truck I decided to do some work on the frame of the boiler assembly
|
|
 |
Well, the etches of frame sides needed a little annealing and rolling so they'd be straight. (March 28, 2009; Ch08.1) |

This is how it looks when the frame side have been inserted in the etched slot of the footplate. |
|
The frame plates where only just tack soldered... |
...to enable the squaring of the frame plates (March 28, 2009; Ch08.2) |
 |
|
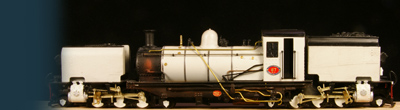
After soldering the frame plates over the whole length and fitting the cross member. I couldn't resist putting all the parts together just for the sake of the impression how big the loco is going to be. And it's huge for a 60 cm loco |
|
 |
|
| Now the work on the frame rested for a while. I resumed working on the truck because I wanted to have one running before the summer holiday. Postponing that until after the summer would probably drain all my remaining courage to complete this project... Who says model railroading is not about emotions? It was December before I picked up the mainframe again. Meanwhile I had succeeded in getting both trucks running and finished (see ch04-1 and ch04-2). | |
|
|
Brake cylinder (yellow) and air tank (Dec 23, 2009; Ch08.6) |
The first thing to be done was fitting the air tank and the brake cylinder. The latter was not among the white metal parts. I cannot imagine it got lost in the process so I must have missed it while going through the inventory. Looking back at the photo's I made then it seems to have been missing from the very start. Instead I made a tank from piece of round plastic. You won't tell the difference after painting, and who will see the cylinder anyway after finishing the loco?
|
Squaring the cab This was done after tack soldering the butt joint on the rear, but before running solder fillets through the corner seams (Dec 22, 2009; Ch08.8)
|
Completed cab assy. Note the even riveting, which I achieved with my home made hand riveter (Dec 22, 2009; Ch08.10) >> |
The cab assy after adding the firebox. Note that the tops of the firebox side sheets are bent a little outward.The boiler initially would not fit in snugly. After a little bending it did. (Dec 24, 2009; Ch08.15) In hindsight I saw that the instruction recommend chamfering the top sides. An observant reader will have noticed that I skipped various cab details (instructions 11-14) and the firebox hatches (15). I preferred to do the heavy soldering work first. If not I would risk these tiny details coming adrift during assembly of the firebox and the boiler. Now I will be able to solder most of the details with 180C solder without harm and I can always revert to 140C solder if necessary |
 |

The boiler added. Note the scribed line on the boiler top as per instruction 17. (Dec 27, 2009; Ch08.19) |
|

Trial fitting on the frame. The tiny holes in the cab front next to the boiler will disappear when you add the fire box wrapper. Guess how I found out!! So if want to use them make sure you ream them sufficiently before fixing the boiler in place. It was too late for me. |
|


Sign my
GuestBook